A business owner’s greatest challenge is finding leads and turning them into customers. Without a solid sales process pipeline, it is impossible to reach potential customers and achieve your goals. A sales funnel is a key marketing strategy to convert prospects into customers. Although this may seem complicated, it is actually not. To create an irresistible funnel, you don’t need to be a programmer. Don’t miss your customers! Let’s create a sales funnel for WordPress.
This article will teach you how to create a sales funnel. Before you can do that, it is important to understand what a sales funnel is and why it is necessary. Let’s get to it!
What is Sales Funnel?
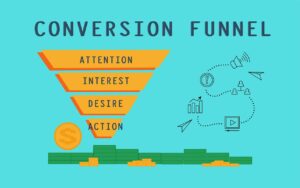
A sales funnel or a customer acquisition funnel is a term used to describe the marketing strategy that tracks the customer’s journey from their initial contact with you to their purchase. A sales funnel, as its name suggests, is both the longest at the top and narrowest at the bottom. Each stage pushes the best qualified prospects to the next stage. You can also drop those who aren’t a good fit for your offer. The goal of the sales funnel should be to convert prospects into buyers. It also encourages them to follow predefined steps.
Steps to Sales Funnel
AIDA (Attention, Interest, Desire and Action) divided the buyer’s journey in four stages. It may differ from person-to-person. These are the most commonly used terms. As a consumer, you go from being a visitor to becoming a prospect to becoming a lead to buying.
1. Awareness:
“Awareness” is the first stage in the sales funnels. This is where the consumer is made aware of your brand. Your website is their first visit. This may be due to an advertisement, Google search or post shared on social networks. The prospect will learn about your product or service, learn about the benefits of the product and build trust. The prospect might also be able to identify the problems they are facing and the best ways to address them.
2. Interest:
This stage is where consumers reflect on the problem and do competitive research to ensure you offer the best solution. The interest stage is when consumers are ready to make a decision about whether your product or service will work for them. You can use this time to attract them with great content that addresses their needs, but not push them to buy. Prospects may be turned off if you push your product or service too early. Establishing your expertise and helping the consumer make informed decisions should be your goal. The lead will move on to the next stage if they are interested in your offer.
3. Decision:
The decision stage in the sales funnel is where the lead decides if they want your product or services. They will pay more attention what you have to offer, including the different options and packages, in order to make the final purchase decision. Now is the best time to offer your best deal. Offer free shipping, a discount code or a bonus product via sales pages, webinars and calls. No matter what the case may be, make it so compelling that your lead will want to take advantage.
4. Action:
The lead closes the sale by closing the deal. The relationship with your customer does not end at the checkout stage. Thank your customer for purchasing, and invite them to share their feedback. Also, be available for tech support.
Why Sales Funnels are so important

You can create a sales funnel to allow you to establish a steady flow of sales instead of constantly chasing them.
Knowing your funnel will help you identify the gaps in it, where prospects are not converting and the areas that they don’t convert. These insights will allow you to make better marketing decisions, invest in the best channels and messaging at each stage, and convert more prospects into paying customers.
You can also build trust and credibility by sharing valuable content. You can gain the trust of your customers and build a loyal customer base. A sales funnel is essential for this reason and Chattertools excels in helping you building the same.
Here are the tools you will need to create a sales funnel:
- A lightweight theme: Google says that around half of visitors won’t wait more than three seconds to load a site. Customers might leave if your pages take too long to load. Your pages will load quickly with a lightweight theme. We recommend high-quality themes such as Attire, CollibriWP and Astra.
- E-commerce Plugin: To create a sales funnel, an E-commerce plugin must be installed. An E-Commerce plugin allows you to configure your online store details, payment methods, and shipping information. Download Manager and WooCommerce are the best WordPress E-Commerce plugins for building sales funnels.
- Sales funnel plugin: Sales funnel builders help customers navigate the sales process. To make rapid progress, you should install a sales funnel plugin like CartFlows.
- Email Marketing Services: Email marketing services can send you emails automatically based on user actions, such as signing up for an email list, downloading lead magnets, abandoning shopping, or joining an email mailing list. This allows you to promote your product or service, and it ensures that your prospects are always in the forefront of your mind. This article will help you choose the best email marketing services.
- Page Builder: With page builder plugins, you can create WordPress pages in less time and with less effort. Page builder plugins make it easy to create a landing page, thank-you page, and pop-ups for your sales funnel. Elementor and Divi are the most popular WordPress page builders.
How to make a sales funnel:
We’ve already discussed the tools required to create a sales funnel. Now it’s time for us to learn how these tools can be used to create a sales funnel in WordPress. Let’s look at each step in creating a sales channel.
Step 1: Install the E-commerce plugin
Installing an e-commerce plugin is the first step to creating a sales funnel. Download and install the Download Manager plugin. To enable your customers to pay online, you will need to add payment gateways. Click on “Download” in your menu bar, and then select “Add-ons.” Download Manager offers 21 gateway add-on options. Choose the gateway that you want to manage and install. Customers can choose their preferred method of payment from multiple gateways. After you have completed your payment gateways, add your products.
Step 2: Install your desired theme
Speed is key to driving conversions. At this stage, you will need to install a lightweight template on your website. We will use Attire as our free theme. Attire is a seamless theme that can be used for any kind of business or digital product selling website. The theme is easy to use and gives your customers a quick overview of your business. This theme works with all major page builders, including elementor, divi and visual composer, making it easy to take your next steps.
Step 3: Install the Page Builder plugin & Create Your Pages
You will now need to install the page-builder plugin. To quickly create key pages, you can use the Elementor plugin. A solid sales funnel must include a landing page, thank you page, and pop-up. Elementor is a core page builder plugin that is free. Elementor Pro, a paid addon that allows you to add forms and popups, is available.
Landing Page
Your prospects will go to a landing site if they click on an advertisement, sign up for webinars, or download ebooks. The landing page is the most likely place prospects will learn about you company. It should direct them to the next step.
Go to “Pages > New” to create your landing page. Click the “Edit With Elementor” option to open the page editor’s editing screen. Drag elements from the left-hand menu to add them to your landing page.
You should ensure that the landing page contains a form where prospects can enter their information. This is important because you will need to continue communicating with them. Include a Call to Action (CTA) button to your landing page. To make your landing page live, click on Publish after you have completed the creation.
Thank You Page:
Next, you need to create a thank you page. This page will confirm that the action was taken. For example, if a customer downloads your digital products, you can thank him simply by saying “Thanks for downloading”. A thank you page can be created exactly as a landing page.
Pop-up:
You should create a popup if you have not placed the signup form on your landing page. Navigate to “Templates >Popups >Add New” to create a popup in Elementor. Click on Create Template to create your popup.
Step 4: Connect Email Platform with Page Builder
This step will allow you to connect your email marketing software with our page builder. This will allow users to enter their email address in the signup form. The email will then be automatically added to the selected email marketing service.
Step 5: Install and Configure WordPress Cartflows
Installing the funnel builder plugin is the final step in creating a sales funnel. The best choice is Cartflow plugin to accomplish these tasks.
After activating the plugin, click on “CartFlows >>Flows>>Add new”. You can choose from the template library or make your own. Click “Create Your Own” to edit the steps and add a title. The thank you page should follow the landing page. You can add pages to your flow by using Add New Step and drag them to their correct locations.
Although it may take some time to optimize and create a sales funnel, it can be a great way to increase your business’s profitability. We hope you found this article helpful in understanding the importance of a sales funnel and how it can be created.


